Last updated on April 11, 2024
Having a list of article isn’t enough, we need to allow users to click through to the actual article. It’s also not a good user experience to have each article open in safari. We want to provide the ability to view the article within our app. Apple UIKit makes this extremely easy by providing a Web View component to view the target website.
1. Add New View Controller
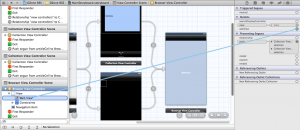
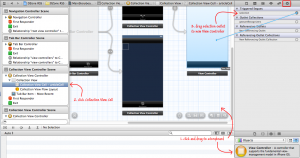
We want to first add a new View Controller that will hold the Web View. This can be done by dragging View Controller from object browser over to the storyboard. Once added, we want to push this new view controller when each Collection View Cell is clicked. First, drill down to the Collection View Cell, view connection inspector, and drag the selection under triggered segues over to the new view controller. Repeat this last step for the other Collection View Controller’s Collection View Cell.
Now, whenever a cell is clicked, it will push this new view controller to the Navigation Controller stack.
2. Add Web View to the View Controller
Go back to the object browser and drag it under the main view of our newly added View Controller.
We now need to create a custom view controller class that will enable us to control what to display in this web view. Following prior tutorial, add a new class named “JSTRBrowserViewController” that’s a subclass of “UIViewController”. Then, expose 2 properties, one for the web view component and the other to hold the target URL.
#import <UIKit/UIKit.h>

@interface JSTRBrowserViewController : UIViewController

@property (retain, nonatomic) IBOutlet UIWebView *webView;
@property (retain, nonatomic) NSString *targetURL;

@end
Since the target url is not a visual component, it does not need the keyword “IBOutlet”. It will be only used to set the target url from the collection view controller when user clicks on the cell. This will require us to synthesize targetURL on the implementation class. Let’s also implement the loading of our target url for the web view component
#import "JSTRBrowserViewController.h"

@implementation JSTRBrowserViewController

@synthesize targetURL;

- (id)initWithNibName:(NSString *)nibNameOrNil bundle:(NSBundle *)nibBundleOrNil
{
  self = [super initWithNibName:nibNameOrNil bundle:nibBundleOrNil];
  if (self) {
    // Custom initialization
  }
  return self;
}

- (void)viewDidLoad
{
  [super viewDidLoad];
  // Do any additional setup after loading the view.
  NSURL *url = [[NSURL alloc] initWithString:targetURL];
  NSURLRequest *request = [[NSURLRequest alloc] initWithURL:url];

  [self.webView setScalesPageToFit:YES];
  [self.webView loadRequest:request];
}

- (void)didReceiveMemoryWarning
{
  [super didReceiveMemoryWarning];
  // Dispose of any resources that can be recreated.
}

@end
In our viewDidLoad method, we use the targetURL to construct an instance of NSURL. Then, we construct the NSURLRequest from and message webView to load this request on load.
Now that we have our custom class, click the recently added view controller from above, go to identity inspector, and update the class from UIViewController to JSTRBrowserViewController. Then, go to connection inspector, and drag the webView outlet over to Web View component within the latest view controller.

3. Setting Target URL
To set the target URL, we need to implement the prepareForSegue:sender method. This is similar to .NET winform event handler. This method will be called prior to performing the connection segue.
- (void)prepareForSegue:(UIStoryboardSegue *)segue sender:(id)sender
{
  JSTRCollectionViewCell *selectedCell = (JSTRCollectionViewCell *)sender;
  JSTRBrowserViewController *targetVC = (JSTRBrowserViewController *) [segue destinationViewController];
  targetVC.targetURL = selectedCell.targetURL;
}
Since we know the destination of our segue will be JSTRBrowserViewController, we cast the destinationViewController and set the targetURL. Additionally, since we now have a new reference, import this new header: JSTRBrowserViewController.h.
But wait, I don’t have a property called targetURL on my JSTRCollectionViewCell! We need to add this property to the bottom of our JSTRCollectionViewCell header file and synthesize it on the implementation class.
#import <UIKit/UIKit.h >

@interface JSTRCollectionViewCell : UICollectionViewCell

@property (retain, nonatomic) IBOutlet UILabel *title;
@property (retain, nonatomic) IBOutlet UILabel *category;
@property (retain, nonatomic) IBOutlet UILabel *summary;
@property (retain, nonatomic) IBOutlet UIImageView *avatar;
@property (retain, nonatomic) IBOutlet UIImageView *thumbnail;
@property (retain, nonatomic) NSString *targetURL;

@end
Then, we need to set this for each and every cell that we display in our app by updating collectionView:cellForItemAtIndexPath method.
- (UICollectionViewCell *) collectionView:(UICollectionView *)collectionView cellForItemAtIndexPath:(NSIndexPath *)indexPath
{
  JSTRCollectionViewCell *cell = [collectionView dequeueReusableCellWithReuseIdentifier:@"articleCell"
forIndexPath:indexPath];
  NSDictionary *item = [_articleList objectAtIndex:indexPath.item];

  NSURL *userImgURL = [NSURL URLWithString:[item objectForKey:@"userimage"]];
  NSData *userImgData = [NSData dataWithContentsOfURL:userImgURL];
  UIImage *userImage = [UIImage imageWithData:userImgData];
  [cell.avatar setImage:userImage];

  cell.title.text = [NSString stringWithFormat:@"%@\n\n\n\n", [item objectForKey:@"title"]];

  NSArray *catList = [item objectForKey:@"category"];
  NSString *catString = [catList componentsJoinedByString:@", "];
  cell.category.text = [NSString stringWithFormat:@"%@", catString];
  cell.summary.text = [NSString stringWithFormat:@"%@\n\n\n\n\n\n\n\n\n", [item objectForKey:@"description"]];

  NSURL *thumbImgURL = [NSURL URLWithString:[item objectForKey:@"thumbnail"]];
  NSData *thumbImgData = [NSData dataWithContentsOfURL:thumbImgURL];
  UIImage *thumbImage = [UIImage imageWithData:thumbImgData];
  [cell.thumbnail setImage:thumbImage];

  cell.targetURL = [item objectForKey:@"link"];

 return cell;
}
As you can see, prior to our return call in this method, we retrieve the link from our dictionary representing the article from the RSS. Now that the cell has been set, our segue can extract it from the source cell that’s been click and pass it to the target view controller that holds the web view.
4. Run it
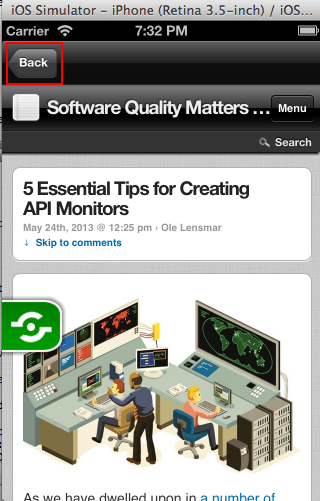
Now, when you run your app, clicking on the cell on the simulator will push a new view controller. Since we’re using navigation controller, adding a new view controller will automatically add the back button for us on the navigation bar.
By default, if the prior navigation bar has no title, then the button will be rendered with “Back”. However, had we named the title bar of our prior navigation bar as “Featured Links”, then our back button would have had the label of “Featured Links”.
This concludes this tutorial series. I have intentionally did not implement Recent Link Collection View. Using the Featured Link Collection View, this should be fairly easy to figure out. You will need to refactor JSTRRSSReader class to handle both Featured and Recent Links. Currently, it’s hard coded to only retrieve Featured. The app that’s actually published has it fully implemented with ability for users to vote. As of May 25, it is currently under review by Apple. I’ll update this post when it does go live. Xcode project with source code for these tutorial can be downloaded from here.


