Last updated on April 11, 2024
Every once in a while, an email thread is started by an individual wanting to know how to connect to SharePoint web services from java. The first time I came across this challenge was back in 2007 when I was building a Proof-of-Concept (PoC) workflow system for the business group I was supporting. One of the key requirements of this system was to retain an audit trail of all emails and documents associated with a given workflow. To put it bluntly, SharePoint wasn’t my first choice. I was very much aware of other document management systems which would have been a better fit. Let’s just say that business politics plays a nasty role in hindering technology decisions. Since I needed to work with SharePoint, the technical problem was the same today as it was back then: Microsoft security protocol, specifically NTLMv2. Given that my initial architecture was based on Java platform, I needed Java to talk to SharePoint web services that was protected behind NTLMv2.
It didn’t take long before I managed to stumble across a pure Java API from Oakland Software. Oakland Software team managed to reverse engineer the NTLMv2 security protocol. With this API, I could plug-in an Oakland’s HttpClient agent into Apache Axis1 to seamlessly communicate with SharePoint. It worked perfectly. However, it was too risky to build a system that relied on a small unknown company that licensed this technology. Instead, I mitigate this risk by re-architecting the whole system on .NET platform. As anyone that has dealt with Microsoft knows, MS products always work better with other MS products. Since then, a lot has changed. Oakland has open sourced their API and Microsoft has made a patent pledge not to purse open-source developers. If you wanted to, you can still use Oakland API and Axis1 to communicate over NTLMv2. That’s one alternative. The other alternative, which I think is more forward thinking, is to use Axis2 with HttpComponents, HttpClient v3 replacement.
The Good, The Bad, and the Ugly
You’re probably thinking, “thanks for the history lesson but I really just want to know how to get java to talk to services behind NTLMv2 security.” First, the good news is that Axis2 will be integrated to HttpClient v4, which happens to support NTLMv2. The bad news is that it won’t be available until Axis2 version 1.7 is released. Then comes the ugly news, as of Aug 22, their latest snapshot implementation doesn’t work. From looking at the source code, there’s a bug that causes Axis2 to still load HttpClient v3. This is due to line 376: “sender = new HTTPSenderImpl();”. The base class is hardcoded to use httpclient v3. Below is a simple patch that I’ve written.
// Commenting out original code as it loads httpclient v3. This should really
// be refactored in an abstract method. For now, patching with simpler if condition
// sender = new HTTPSenderImpl();
if(this instanceof org.apache.axis2.transport.http.impl.httpclient4.HTTPClient4TransportSender) {
  sender = new org.apache.axis2.transport.http.impl.httpclient4.HTTPSenderImpl();
} else {
  sender = new org.apache.axis2.transport.http.impl.httpclient3.HTTPSenderImpl();
}
Ideally, this class should have an abstract method that will be over written by extended classes in httpclient3 package or httpclient4 package. For now, I’ve patched it to perform a simple instance check to identify the extended class and call the correct corresponding HTTPSenderImpl class. The following will provide step by step instructions on how to run Axis2 v1.7 + HttpComponent v4.1 to communicate to a .NET SOAP service sitting behind NTLMv2
1. Setting up IIS with NTLMv4
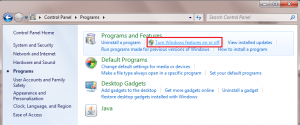
First, We need to setup test environment with NTLMv2 enabled. If you already have access to IIS with NTLMv2 enabled, you can skip to the next section. Otherwise, here are instructions on how to setup IIS 7 on Windows 7 Professional, Enterprise, or Ultimate: Go to your Control Panel and click Programs -> “Turn Windows features on or off”.
Expand “Internet Information Services” and check the following features:
- IIS Management Console
- IIS Management Service
- .NET Extensibility
- ASP.NET
- ISAPI Extensions
- ISAPI Filters
- Request Filtering
- Windows Authentication
Once installed, go to “Control Panel” -> “System and Security” -> “Administrative Tools” and open “Internet Information Service (IIS) Manager”. You can either perform the following steps at the server level or at individual site level. In either place, if you click on your server name or “Default Web Site”, you’ll have several options appear on right. Double-click on “Authentication” and disable all but Windows Authentication option.
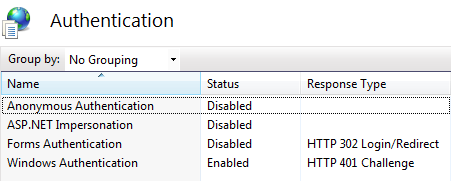
This will enable NTLMv2 and protect you site. All requests to this site will challenge user for valid Windows credentials.
2. Deploy Test Application
Download my simple .NET TimeService web application. Unzip and place the content anywhere on your computer. From IIS Manager, create a virtual application under Default Web Site and give the alias “TimeService”. The “Physical Path” should point to the location of the recently downloaded and unzipped .NET web application. If you open up App_Code\TimeService.cs file, you’ll see the following.
[WebMethod]
public string Now(string name)
{
  return name + ", current time is " + DateTime.Now.ToShortTimeString();
}
This is a simple .NET web service application that returns the current time for the specified parameter. If all works out, when you visit http://localhost/TimeService/TimeService.asmx?WSDL, assuming your site is running under port 80, you’ll be prompted to login with your windows credential. Once logged in, you’ll see the WSDL for this web service.
3. Generating Axis2 Client
If you’re familiar with Axis, you should know that it comes with a tool to generate Java client based on specified WSDL. If you’re not, now you know. Since the target WSDL is protected behind NTLMv2, the simplest way is to visit the site using your credentials and then save the WSDL to your file system. To generate the java client stubs, please visit Axis2 website for their instructions. It’s pretty thorough. You can also download my Eclipse Projects which has both the above Axis2 v1.7 patch and generated java stubs based on the TimeService WSDL.
4. Running Java Client
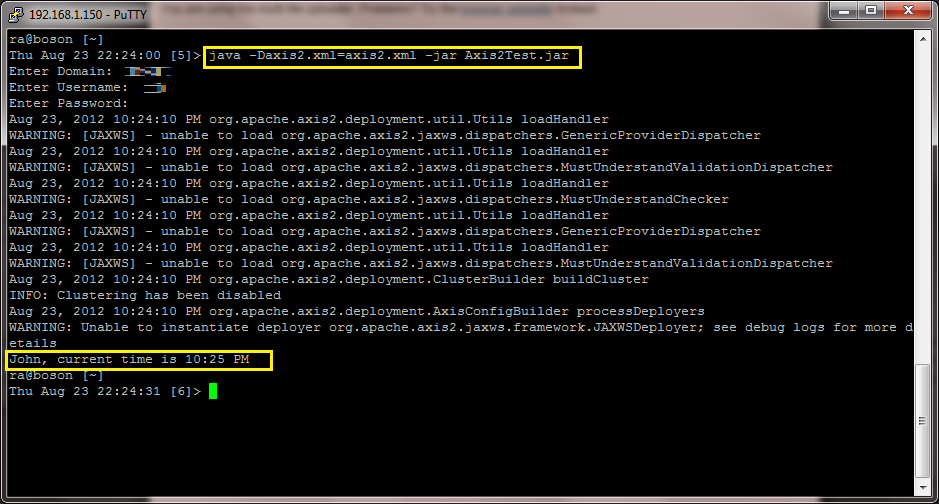
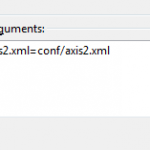
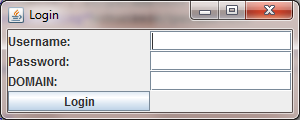
In Axis2NTLMClient project downloaded from prior step, locate the Client.java class which contains the main method. Prior to running this class, you must add a VM argument (“-Daxis2.xml=conf/axis2.xml”) under Run Configuration in Eclipse (see image left). This VM argument informs Axis2 to use the axis2.xml located in conf folder instead of the default that comes with axis2-kernel.jar. The version in config/axis.xml has been modified to inform Axis2 to use HTTPClient v4 Transporter (line 232). When you run this class, you will be prompted with a login screen. This is a custom login dialog that I’ve written as I’m not a fan of saving username and password in properties file or in code. This simple login dialog will capture your username, password, and domain. If all goes well, you should see the following message on your console screen: “John, current time is <<your current time>>”.
Analysis
When Client class is constructed, it will call the setupAuthentication() method. This method will construct the authenticator and will set the username, password, and domain entered by user.
private void setupAuthentication() {
  this.auth = new HttpTransportPropertiesImpl.Authenticator();
  try {
    showLoginDialog();
  } catch (java.awt.HeadlessException e) {
    log.fine("User does not have a desktop session! using console");
    showLoginConsole();
  }

  auth.setRealm(AuthScope.ANY_REALM);
  auth.setHost(this.host);// must MATCH target Host
  auth.setPort(this.port);// must MATCH target Port
}
The HeadlessException catch logic is put in place in the event user does not have a windows/xsession available. It will use the default console to capture username, password, and domain. By default, I set the Realm to ANY_REALM. I haven’t played around enough with Realm to give you additional insight. As for host and port, it MUST match the target URL. For example, if you decided to connect to site via IP address (e.g. 127.0.0.1) instead of “localhost”, you must setHost() with IP address. For this reason, my Client class is constructed with host and port to ensure consistency.
public String getResponse(String param) {
  try {
    TimeServiceStub service = new TimeServiceStub(getServiceEndPoint());

    Options options = service._getServiceClient().getOptions();
    options.setProperty(HTTPConstants.AUTHENTICATE, this.auth);
    options.setProperty(HTTPConstants.CHUNKED, Boolean.FALSE);

    Now req = new Now();
    req.setName(param);
    NowResponse resp = service.now(req);

    return resp.getNowResult();

  } catch (AxisFault e) {
    log.severe(e.getMessage());
  } catch (RemoteException e) {
    log.severe(e.getMessage());
  }
  return new String();
}
Once the authenticator has been constructed, Axis2 generated java class TimeServiceStub is used to connect to the .NET SOAP service. The helper method “getServiceEndPoint()” will generate and return the location of the webservice end point. It then set the options for AUTHENTICATE to use the constructed authenticator and disables CHUNKED on the transport encoding. If you do not disable the CHUNKED transport encoding on .NET services, it will break. Request class Now is used to set the parameter and the result of the SOAP service is returned through NowResponse class.
As HttpComponent v4 has a pure Java implementation of NTLMv2, you can run this client from any OS. Here’s a screenshot from my Ubuntu Server.
Comments are closed.